

Tom Whitfield, Features Reporter.
There is a drawer in most bathrooms with four or five bottles of gel polish in it, most of them three-quarters full, all of them slightly gluey around the cap. The colour chipped within four days, or it peeled off in one triumphant sheet the first time a jumper cuff caught it, and the conclusion most of us reach is that the polish was cheap, or wrong, or simply not gel enough. Type “why does my gel polish peel off” into a search bar and you will find thousands of people asking the same thing, usually followed by a list of more expensive bottles to buy instead.
The more useful question is rarely about the bottle. Gel polish is a chemical system: it needs a specific surface, a specific thickness, and a specific amount of light energy to cure properly, and most premature chipping traces back to one of those three things going wrong, not to the formula itself. A salon technician using a supermarket-shelf gel and doing the prep correctly will usually outlast a home manicure done with a luxury brand and rushed prep. This piece is about the technique, not the price tag: how to get a fortnight of wear, sometimes longer, from polish that is probably already sitting in your bathroom cabinet.
Why Gel Chips At The Tips First
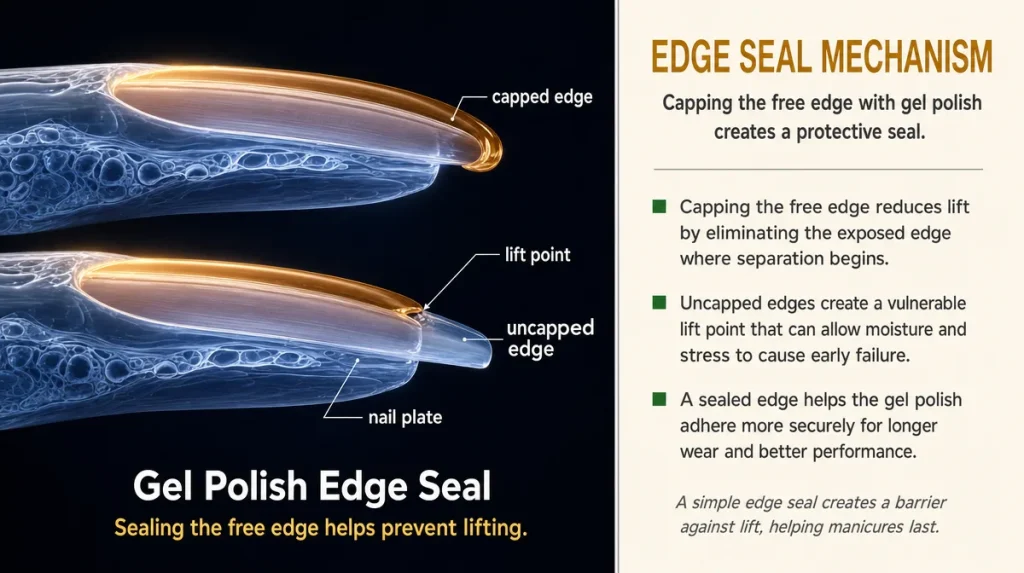
Gel polish fails from the edges inward almost every time, and there is a simple reason for it. The free edge of the nail, the bit that extends past the fingertip, is the part that meets keyboards, car doors and jumper cuffs hundreds of times a day. It is also the part most people forget to seal.
Think of gel polish as a sheet of plastic film wrapped around the nail rather than paint sitting on top of it. If the film does not wrap fully over the tip and slightly onto the underside, it behaves like a plaster with an unstuck corner: one catch and the whole thing lifts.
A 2021 study in the International Journal of Cosmetic Science on nail coating adhesion found that mechanical stress at the free edge accounted for the majority of early coating failure in daily-wear testing, well ahead of general wear across the nail plate. That matches what most of us feel: the polish looks fine on the nail bed for a week, then a triangle lifts off the tip of one thumb.
The fix costs nothing and takes about three extra seconds per nail: run the brush over the very edge of the nail, capping it, on every single coat, including the base coat. Skipping this step is the single most common reason gel that cured perfectly still lifts within a week.
Preparing The Nail Plate Properly
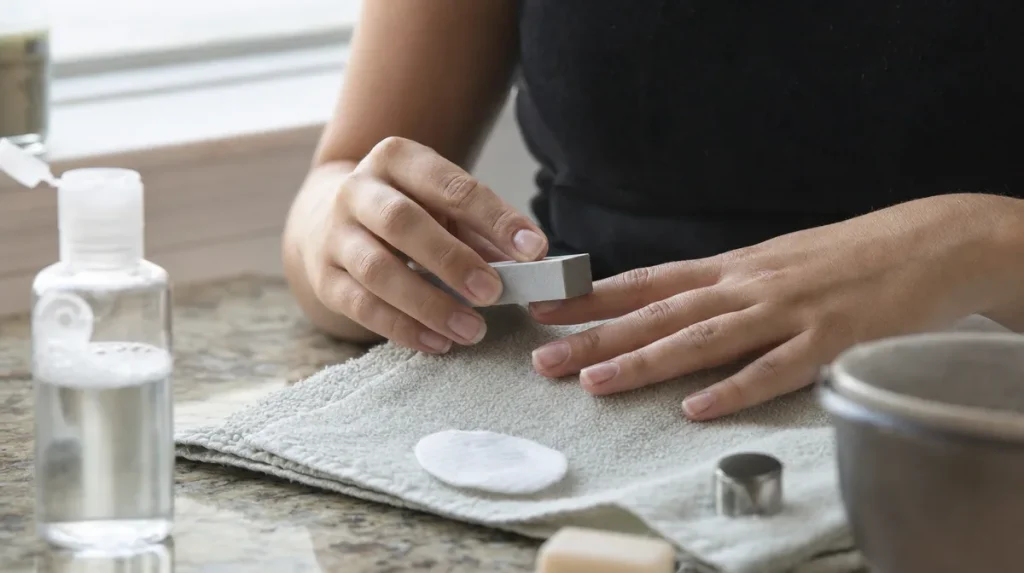
Gel adheres to nail keratin the way tape adheres to a wall: badly, if there is dust, oil or a shiny top layer in the way. Nail plates carry a natural layer of oil and a smooth surface that resists grip on their own.
The sequence that actually matters, in order: push back the cuticle gently rather than cutting it, buff the shine off the nail surface with a fine grit buffer (nothing coarse, just enough to dull the gloss), wipe the nail with an alcohol-based cleanser or a proper nail dehydrator, and avoid touching the nail plate with fingers afterwards. Skin oil transfers in seconds.
Many home manicurists apply base coat straight onto nails that have just been washed with ordinary soap, which leaves a residue of moisturiser and fragrance oils behind. Washing hands is good hygiene; it is not nail prep. A specific dehydrating wipe, sold in most chemists’ nail aisles for a few pounds, does a different job entirely.
Self-test: after buffing and wiping, breathe warm air onto the nail. If it mists and clears within a second or two, the surface is properly dry and oil-free. If moisture lingers, wipe again before applying anything.
The Base Coat Mistake That Undoes Everything
Base coat is often treated as an afterthought, a thin layer to get through before the colour goes on. In gel systems it is doing the actual structural work: it is the layer that bonds to the nail keratin, while the colour coats bond to each other and to the base.
Applying base coat too thickly is one of the most common home errors. A thick layer takes longer to cure all the way through, and gel that has not cured through its full depth stays slightly soft underneath a hard top surface, which is exactly the condition that leads to whole-nail peeling rather than tip chipping.
The visible cue is straightforward: a properly thin base coat looks almost transparent on the nail, with the natural nail colour still showing through faintly. If the base coat looks opaque or milky before curing, it has gone on too thick.
Base coat also needs to touch bare, prepared nail, not a leftover trace of old gel or a ridge of cuticle skin. Reapplying gel over old, partially removed polish is a common shortcut that rarely lasts more than a few days, because the new base is bonding to old, already-lifting product rather than to nail.
Curing Time And Lamp Strength: What Actually Matters
Two lamps that both call themselves “gel curing lamps” can deliver very different amounts of light energy, and this is where a great deal of home frustration comes from. LED lamps and UV lamps cure gel through different wavelengths, and a gel formulated for one does not always cure fully under the other.
A useful analogy: curing gel is like baking, not like drying paint. It needs the right temperature for the right time, not just “some time.” Under-curing leaves a soft, tacky layer that looks finished but is not chemically set, and that soft layer is what smudges, dents or peels early.
The fix is unglamorous: check the cure time printed on the polish bottle, not on the lamp, and match your lamp wattage to it. If in doubt, cure for a few seconds longer rather than shorter; over-curing by a small margin rarely causes problems, while under-curing reliably does.
A tacky residue on the surface after curing is normal for many gel systems and is meant to be wiped away with a lint-free pad and a small amount of cleanser, not buffed off or left in place. Leaving it on is a common reason top coats look dull rather than glossy.
Applying Thin, Even Coats Without Streaking
Streaking usually comes from one of two habits: loading too much polish onto the brush, or trying to cover the whole nail in a single stroke. Gel polish is self-levelling to a degree, but it needs a thin enough layer to actually level before curing locks it in place.
The method most technicians use: wipe the brush against the neck of the bottle so roughly half the polish comes off before touching the nail, place one small bead near the cuticle line, then draw it down and out in three light strokes rather than one heavy one, leaving a small gap from the cuticle itself so the polish can flow toward it without flooding the skin.
Two thin coats consistently outperform one thick coat. It feels counterintuitive when the first thin coat looks patchy, but that patchiness disappears once the second coat and top coat go on, and the finished result cures more evenly than a single thick layer ever does.
If a coat drags or pulls rather than glides, the polish has usually thickened slightly with age or exposure to light and air. Rolling the bottle gently between the palms, rather than shaking it, redistributes the pigment without introducing air bubbles that shaking causes.
Reading Your Own Results Honestly
Two weeks is a reasonable, evidence-backed expectation for well-applied gel polish on fingernails, and roughly ten to fourteen days is the range most nail technicians cite before natural nail growth alone starts to make the manicure look dated at the cuticle line, regardless of how well it has held. Expecting three or four weeks from any gel system, however well applied, usually ends in disappointment for reasons that have nothing to do with technique.
The way gel fails matters as much as when. Chipping at the tips within the first week almost always points back to an uncapped free edge or under-curing. A single nail lifting as a whole sheet, rather than chipping, usually means oil or moisture was trapped under the base coat during application. Gradual dulling of the top coat without any lifting is typically a curing or wiping issue, not an adhesion one.
Keeping a rough mental note of which nail failed and how, rather than simply concluding “it did not last,” is the fastest way to work out which single step in the sequence needs adjusting next time.
What Matters And What Is Marketing
Nail aisles at Boots and Superdrug are full of language that sounds technical without changing the chemistry much: “salon strength,” “7-in-1 formula,” “gel-effect shine.” Some additions genuinely help, such as a flexible resin that resists tip chipping, but many premium claims describe marginal differences that prep and curing technique will outweigh in practice.
What does reliably matter: the base coat and top coat being from a compatible system (mixing brands occasionally causes adhesion issues, though many gel systems are broadly cross-compatible), a lamp that matches the gel’s cure requirements, and a nail plate that has been properly dehydrated before application.
What matters far less than the price tag suggests: shimmer particles, scent, and bottle design. A gel polish sold on offer at a chemist and applied with careful prep will typically outlast an expensive one applied over oily nails with a single thick coat.
Good Housekeeping’s testing guidance on home gel kits has previously noted that user technique accounted for more variation in wear time than product choice across the kits it assessed, which lines up with what most nail technicians say in practice.
Removing Gel Without Damaging The Nail Underneath
Peeling gel off is the single habit most likely to thin and damage the nail plate, because gel polish bonds more strongly to nail keratin than keratin bonds to itself in its thinner outer layers. Ripping it off can take a layer of nail with it.
The gentler method: lightly buff the shiny top coat to break the seal, wrap the nail in a cotton pad soaked with acetone, cover with foil or a purpose-made removal clip, and leave for ten to fifteen minutes before gently pushing off the softened gel with a cuticle stick, never scraping or prising.
Nails that come out of every gel manicure looking thin, flaky or ridged are usually being removed too aggressively rather than damaged by the gel itself. A short break between manicures, even a week or two, alongside a moisturiser or cuticle oil applied daily, gives the nail plate a chance to recover, particularly useful advice during damp winters when central heating dries out skin and nails together.
Key Takeaways
Most gel polish failure is a technique problem, not a product problem. The nail plate needs proper dehydrating, not just washing, before anything goes on. Base coat should look almost sheer, never milky, and every coat, including base, should be capped over the free edge. Cure time should follow the bottle’s instructions, matched to lamp wattage, with a slightly longer cure preferred over a shorter one. Two thin coats beat one thick coat every time. Removal should always involve soaking and gentle lifting, never peeling.
A Quick Pre-manicure Checklist
- Buff the shine off each nail lightly before starting
- Wipe with a proper nail dehydrator, not soap and water
- Apply base coat thin enough to see the nail colour through it
- Cap the free edge on every coat, including base
- Cure for the time printed on the bottle, matched to your lamp
- Use two thin colour coats rather than one thick one
- Wipe away tacky residue after the final cure
- Soak gel off with acetone, never peel it away
This article is general information and does not replace advice from a qualified nail technician or dermatologist.
Individual results vary depending on nail condition, product system and application technique.